The Ultimate USB Thumb Drive Toolkit
Set Up a Windows to Go Environment
The perfect excuse for buying a new USB 3.0 thumb drive
One of the coolest new features of Windows 8 is its ability to run from a USB thumb drive. Microsoft calls the feature “Windows to Go.” With Windows to Go, you can install Windows 8 and all of your favorite applications and tools to a thumb drive, plug it into a PC, boot to the drive and your entire workspace will be available.
To create a Windows to Go portable environment, you need a USB 3.0 thumb drive with a capacity of at least 32GB, a Windows 7 or 8 PC to actually configure the thumb drive (Windows 8 is preferable because of its native ability to mount ISO files), Microsoft’s Automated Installation Kit, or AIK (available here: http://bit.ly/relfql), and a Windows 8 installation disc or ISO.
First Things First
If you’ve got everything available and downloaded, install the Windows AIK first. It’ll create a \Program Files\Windows AIK directory with a number of other directories within. In the \Tools subdirectory, you’ll see a number of other subdirectories labeled with specific system architectures. If you’re creating the Windows to Go drive on a system running a 64-bit edition of Windows, open the \amd64 folder. If you’re running a 32-bit edition of Windows, open the \x86 folder. In those folders you’ll see a file named ImageX.exe. Copy ImageX.exe and place it into a new subdirectory of your choosing—we used C:\ToGo.
Once you’ve got the correct ImageX utility copied, you need to extract the Windows installation image from the Windows 8 ISO. Mount the ISO (or extract it to a folder) and in the \sources directory find the file labeled install.wim and copy it to the same directory in which you placed the ImageX utility.

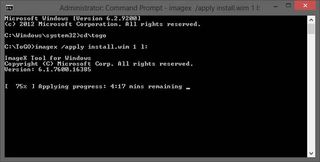
The ImageX utility included in the Windows AIK is used to install the Windows image to the USB flash drive.
Prep Your Drive
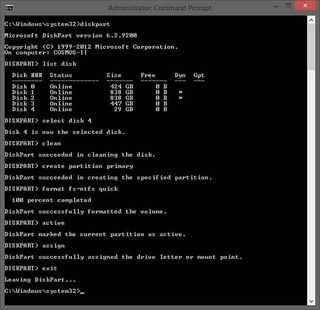
With ImageX and the Windows 8 install.wim file copied, it’s time to prep the flash drive. Connect the drive to your system, then open a command prompt as an administrator and run Diskpart. At the Diskpart prompt, first type list disk and hit Enter to see a numerated list of drives connected to your system—on our machine, the thumb drive we wanted to use was listed as Disk 4. When you know the number of your thumb drive, type select disk 4 (replace the 4 with the number of your drive) at the Diskpart prompt and then hit Enter again. Once the proper drive is selected, you’ve got to run a handful of commands to clean, re-partition, and reformat the drive in preparation for the Windows to Go installation. Type the following commands in succession, hitting Enter after each one: clean, then create partition primary, then format fs=ntfs quick, then active, then assign. Then exit the Diskpart utility and navigate to the directory where you placed the ImageX and Install.wim files. Since we used C:\ToGo, at the command prompt we typed cd\ToGo and hit Enter.
The biggest gaming news, reviews and hardware deals
Keep up to date with the most important stories and the best deals, as picked by the PC Gamer team.

Use Windows’ built-in Diskpart utility to clean the flash drive, create an active primary partition, and format it with the NTFS file system.
Install Windows
The next step is to actually install Windows to the flash drive using ImageX. At the command prompt, type: imagex /apply install.wim 1 X: (where X is the drive letter of your flash drive). This command tells ImageX to apply the first image within the install.wim file to drive letter X. The installation process will take a good 15–20 minutes or so depending on the speed of your drive. Once the ImageX process is complete, the next step is to install the correct boot record. While still at the command prompt, type bcdboot.exe X:\windows /s X: /f ALL (again, replace the X with the drive letter of your thumb drive) and hit Enter. This command tells the bcdboot utility to install the boot record from X:\windows directory to the root of the drive.
Once the boot record is installed, your Windows to Go drive is ready to use. The first time you boot to it on a system, it’ll detect new hardware and configure the necessary devices, but it’ll eventually load the Modern UI and behave just like a local Windows installation. Activate the OS, install your applications and any necessary drivers, and you’re done.
Alan has been writing about PC tech since before 3D graphics cards existed, and still vividly recalls having to fight with MS-DOS just to get games to load. He fondly remembers the killer combo of a Matrox Millenium and 3dfx Voodoo, and seeing Lara Croft in 3D for the first time. He's very glad hardware has advanced as much as it has though, and is particularly happy when putting the latest M.2 NVMe SSDs, AMD processors, and laptops through their paces. He has a long-lasting Magic: The Gathering obsession but limits this to MTG Arena these days.
Most Popular


