The Ultimate USB Thumb Drive Toolkit
Take Your Apps on the Go
Portable apps let you use any PC without leaving a trace
By far, one of the handiest things to do with a USB thumb drive is to create a mobile workspace, loaded up with portable apps. If you’re unfamiliar with portable apps, they’re essentially self-contained versions of programs that work entirely from their installation directory and don’t leave any trace on the host PC. Once configured, you can take your thumb drive loaded up with portable apps anywhere, plug it in, and all of your favorite applications and data will be right there waiting for you.
Portable versions of popular applications are freely available from many developers’ websites. Technically, all that’s required to use a portable app is to download and install/run it right from a thumb drive. If you’d like to have a wide assortment of portable apps available, however, managing them all can get a bit unruly, since you can’t simply create a directory of shortcuts—the shortcuts break if the thumb drive’s drive letter changes. But that’s where the PortableApps Platform comes in.
Enter PortableApps
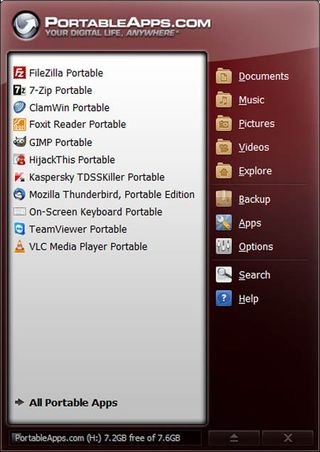
The PortableApps Platform is an easy-to-use launcher for managing and running portable apps. To use it, download the tool from www.portableapps.com and install it to your thumb drive. While on the site, you can download a wide array of portable apps too. Install the portable apps to the thumb drive as well, and when you run the PortableApps Platform (by double-clicking the Start application on the root of the drive), all of your apps will be listed in a Start-Menu-like launcher.
Some of our favorite portable apps are Firefox, FileZilla, 7-Zip, OpenOffice, and GIMP. For the most part, if there’s a popular open-source desktop application available, there’s a portable version of it out there, too.

The PortableApps launcher gives you easy access to all of your portable apps from a single interface.
Install a Dedicated HTPC OS
Use OpenELEC on a thumb drive for media duties
The biggest gaming news, reviews and hardware deals
Keep up to date with the most important stories and the best deals, as picked by the PC Gamer team.
There’s a lot of debate among home theater PC enthusiasts. Some prefer their HTPCs to be Jacks-of-all-trades that run Windows and are as adept at playing movies as they are at running desktop applications. Others prefer their HTPCs to be simple boxes that are strictly for multimedia playback.
Well, why not have both?
The Open Embedded Linux Entertainment Center, or OpenELEC, is a tiny Linux distro that leverages XBMC (formerly known as the Xbox Media Center) and can be run right from a bootable thumb drive (or any external drive, for that matter). With OpenELEC, your HTPC’s internal drive can boot whatever OS you like, but should you choose to go the streamlined route, you can boot from the OpenELEC- equipped thumb drive and quickly access your media.
Get OpenELEC
If you’d like to give OpenELEC a try, point your browser to www.openelec.tv and download the distribution that best matches your hardware. There are versions for AMD APUs, Intel processors, and Nvidia Ion-based platforms—among many others—with file sizes of only 80–125MB. Once you’ve got the distro downloaded, decompress it into a folder, and connect the thumb drive you’d like to use to your PC—it can be as small as a few hundred megabytes.
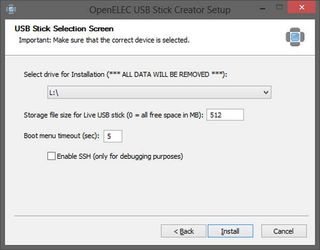
In the folder where you’ve decompressed OpenELEC, you’ll find a file named create_livestick. Double-click it, and follow the onscreen prompts to prep the thumb drive and install OpenELEC. The process requires only four clicks: two to start the installation and accept the license agreement, a third to select the thumb drive (which should be automatically identified), and a fourth to finalize the installation.
When the OpenELEC installation is done, connect the thumb drive to your HTPC and boot from it. On the initial splash screen you’ll be asked to either install it to the PC or run the live edition right from the flash drive. Run the live edition and configure XBMC to your liking and you’re good to go.

OpenELEC includes a utility to prepare a bootable thumb drive containing the OS.
Create the Ultimate USB Boot Drive
Arm yourself with the tools to meet any PC emergency
Every PC tech, amateur, or pro needs a boot disk in their arsenal jam-packed with various apps and utilities for recovering files and passwords, scanning for malware or disk defects, taking disk images, and myriad other essential tasks. There are a handful of excellent options to choose from, but few offer as extensive a line-up of applications as Hiren’s Boot CD.
Hiren’s Boot CD, available at www.hirensbootcd.org , started its life as a less-than-savory tool rife with pirated software. But the developers have since gone legit and replaced all of the pirated apps with excellent freeware alternatives. The Hiren’s Boot CD ISO is meant to be burned to a disc so it’s write protected and insulated from malware, but it can also be written to a thumb drive using a couple of freely available utilities.
Prepare Your Drive
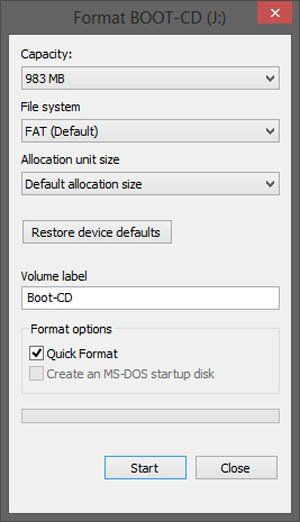
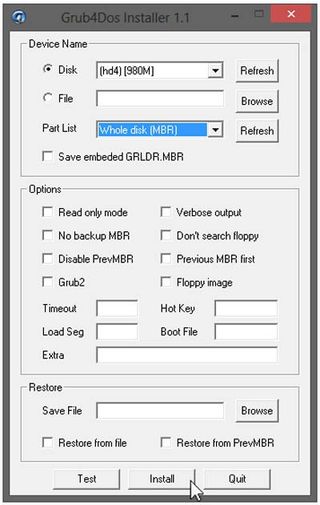
To create a bootable thumb drive with Hiren’s Boot CD files, you’ll need a drive with a capacity of at least 1GB, a copy of the Grub4DOS Installer (also available at HirensBootCD.org), the Hiren’s Boot CD ISO, and if you’re on Windows 7, a utility like WinRAR or 7-Zip to extract the necessary files from the ISO (Windows 8 can mount ISO files natively, so you won’t need a separate utility). Once you’ve got everything gathered up, connect your thumb drive and format it using the FAT file system (right-click the drive in File Explorer and choose Format from the menu), to ensure the drive is free of any data. Then run the Grub4DOS Installer utility as an administrator. In the program window that opens, click the Disk radio button and then select your thumb drive from the adjacent drop-down menu. Then, hit the Refresh button next to the Part list drop-down menu and select Whole disk (MBR) from the associated drop-down. Hit the Install button at the bottom of the interface to install the Grub4DOS universal bootloader to your thumb drive—it’ll only take a couple of seconds .
Populate Your Drive
Once you’ve got the Grub4DOS bootloader installed, the next step is to copy all of the Hiren’s Boot CD files over to the thumb drive. Extract the files from the ISO (or mount it if you’re on Windows 8) and copy all of the files and folders to the thumb drive. When all of the files have been copied over, navigate to the HBCD folder on the drive and copy the grldr and menu.lst files within the HBCD folder to the root of the drive. Once the grldr and menu.lst files have been placed on the root of the drive, it’s ready to use.

To prep your drive, format it first to ensure it is clean and free of data.

You’ll need to install the Grub4DOS bootloader to your thumb drive before it’ll run Hiren’s Boot CD.
Click the next page to read about how to troubleshoot and boot from the USB.
Alan has been writing about PC tech since before 3D graphics cards existed, and still vividly recalls having to fight with MS-DOS just to get games to load. He fondly remembers the killer combo of a Matrox Millenium and 3dfx Voodoo, and seeing Lara Croft in 3D for the first time. He's very glad hardware has advanced as much as it has though, and is particularly happy when putting the latest M.2 NVMe SSDs, AMD processors, and laptops through their paces. He has a long-lasting Magic: The Gathering obsession but limits this to MTG Arena these days.
Most Popular


