The Ultimate USB Thumb Drive Toolkit

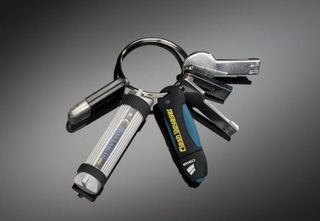
Although they were once considered expensive luxuries to most users, USB thumb drives have become nearly as ubiquitous as the now defunct floppy disk. Thumb drives of all shapes and sizes are currently sold at corner drug stores, freely disseminated at trade shows, and even given out as digital business cards. Thumb drives are so commonplace now that it’s not unusual for PC users to have amassed huge collections of drives that, for the most part, do little else but sit around collecting dust. We speak from experience.
Though some of the drives you’ll have lying around are likely to be small in terms of their usable capacity, that doesn’t mean they’re useless. Even thumb drives with capacities of only a few megabytes can still come in handy for creating things like bootable DOS disks, which can be used to flash the BIOS on an older motherboard or graphics card, or even bootable disks with a full-blown HTPC operating system.
We’re going to cover a number of handy projects in this article that’ll help put those neglected thumb drives to good use. Before we continue, though, a word of caution: All of these projects will destroy the data stored on the drives. If there’s anything important on them, back it up before attempting any of the projects listed here. You’ll be happy you did—trust us on this one.
Create a Custom Windows Install Disk
Speed up and minimize the hassle of installing Windows
Many of us have installed Windows more times than we can count. Whether it’s for building or testing a new system or repairing an older rig, installing Windows can be a regular occurrence. With more recent versions of Windows, the installation process has become more streamlined, but it can still be a chore, especially if you’re using optical media and have to manage multiple discs and product keys for all of the different versions that are available. Thankfully, there’s a faster and easier way to do it using a USB thumb drive.
There are a number of ways to create and customize a Windows installation disk. We’re going to outline one of the easiest methods here using Microsoft’s own Windows 7 USB/DVD download tool (the same process works with Windows 8, too) and a bit of simple file editing. When done, you’ll have yourself a customized Windows installation disk that can install any edition of Windows—like Home Premium and Ultimate or Windows 8 and Windows 8 Pro—and it won’t require a product key during the installation process. There are much more involved methods for customizing a Windows installation disk, which can also give users the ability the incorporate applications and drivers and even pre-configure many settings, but for most enthusiasts, the method we’ll outline here should still come in quite handy.
Gather Your Materials
Before you begin, you’ll need to have a USB thumb drive with a capacity of at least 4GB (larger is better if you want to store other files on the drive), ISO files for Windows 7 or 8 (a Google search will lead you to a legitimate source for the ISO you need, such as Digital River), a copy of Microsoft’s Windows 7 USB/DVD tool (download here: http://bit.ly/162L74X) , and, of course, a PC running Windows to complete the process. Note that the Windows 7 USB/DVD tool requires the .NET Framework to be installed on your machine, so you may need to install that, as well.
The biggest gaming news, reviews and hardware deals
Keep up to date with the most important stories and the best deals, as picked by the PC Gamer team.
Install Files to Drive
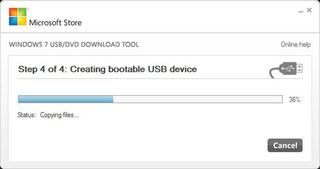
Once you’ve got your ISO file(s) handy, connect the thumb drive to your system, note its drive letter, and then install and run the Windows 7 USB/DVD tool. On the initial screen, you’ll be prompted to browse for your Windows ISO file. Click the Browse button, navigate to wherever you saved the ISO, click the Open button, and then click Next. On the subsequent screen, you’ll be asked to choose your media type. The Windows 7 USB/DVD tool can create a bootable DVD or USB device. Since we’re focused on thumb drives here, click the USB Device button. On the next screen, choose your thumb drive from the drop-down menu and then click the Begin Copying button. The Windows 7 USB/DVD tool will format and prep the thumb drive and then copy over all the necessary installation files automatically.

Microsoft’s Windows 7 USB/DVD tool can prep a thumb drive and copy the installation files over in just a few simple steps.
When the Windows 7 USB/DVD tool is done doing its thing, close it, and you’re technically finished and ready to go. However, by default, the installer will only offer the option to install whichever version of Windows was designated by the ISO used to create the drive (Home Premium, Ultimate, etc.). Windows 7 and 8’s image-based installation method is capable of installing any edition of Windows (within the same family) with a bit of tweaking, though.
Edit Your ISO File
If you created a Windows 7 install drive, insert it into your PC and browse to the \sources\ directory. In that directory, delete the file named ei.cfg. With Windows 8 the process is a bit different. Create a simple text file named ei.cfg (or edit the one you have if it is already present) with the following contents:
[Channel]
Volume
[VL]
1
Save the file and you’re done.

The Results
So, how much time can you save installing Windows from a USB thumb drive? When using a USB 2.0 flash drive, it took Windows 7 Ultimate x64 six minutes, 14 seconds to go from the “Windows is loading files” prompt to the “Completing installation” prompt on a Core i5 Dell laptop equipped with a 128GB SSD. Performing the same test with a USB 3.0 drive resulted in a time of only five minutes, 49 seconds. When timed using the Windows 7 installation DVD, however, the same process took 13 minutes, 51 seconds. That’s a big time savings, especially if you find yourself installing Windows often. Store all of your favorite applications and most commonly used drivers on the thumb drive as well, and you can have them all installed right away, too, without having to swap a single disc.
Click the next page to read about how you can take your apps on the go with you.
Alan has been writing about PC tech since before 3D graphics cards existed, and still vividly recalls having to fight with MS-DOS just to get games to load. He fondly remembers the killer combo of a Matrox Millenium and 3dfx Voodoo, and seeing Lara Croft in 3D for the first time. He's very glad hardware has advanced as much as it has though, and is particularly happy when putting the latest M.2 NVMe SSDs, AMD processors, and laptops through their paces. He has a long-lasting Magic: The Gathering obsession but limits this to MTG Arena these days.
Most Popular


