RimWorld beginner's guide
Learn how to master the interface of this complex colony builder and pick up some important do's and don'ts.

RimWorld is a fantastically fun, strategically rich sci-fi colony builder with a focus on the interpersonal relationships between your characters. Sometimes they eat each other. Sometimes you play a custom scenario where the goal isn't survival: it's drinking a lot of beer and lighting yourself on fire. RimWorld can be many things, but it's not an easy game to learn to play.
Like Dwarf Fortress, RimWorld is most enjoyable as a sim that creates wild and memorable stories. It has a more serviceable interface than many others in the colony-building genre, but it can still be guilty of the more, ahem, opaque and byzantine choices of interface design that characterize games like Dwarf Fortress. That’s not to mention the variety of things that can go wrong within the game itself! Those things are called fun. Problems with the interface? Those aren't so fun. This beginner's guide aims to help you get to the fun of survival or failure or cannibalism hidden behind RimWorld's intimidating menus and systems.
For the purposes of this tutorial, choose the default scenario—Crashlanded. I’d recommend “Rough” or easier difficulty and the Cassandra Classic AI storyteller if you’re familiar with this kind of game and up for a challenge. Choose Phoebe Chillax if you’re interested in a smoother, more beginner-friendly experience.
Once you generate your world, choose somewhere mountainous or hilly in a temperate or jungle climate—you’ll have a generous growing season and plenty of obstacles to turtle up inside. Finally, randomize your colonists until every one of them is at least willing to engage in violence and dumb labor.
Be wary of anyone who won’t haul or clean, and your first few recruits need to know how to scrap. Leave the more advanced stuff for later.

Master the interface basics
Learn to pause: Let your colonists’ escape pods hit the dirt. Let them get out and start puking. Hit spacebar to pause. Pause is going to be your most faithful friend in this game. (Actually, it’s your only friend!) Pause early. Pause often.
You’ve also got three game speeds—mapped to 1, 2, and 3 on your keyboard. Learn them, use them. Speed two will get you through the days while speed three gets you through the nights. During combat, your game will lock at speed one.
The biggest gaming news, reviews and hardware deals
Keep up to date with the most important stories and the best deals, as picked by the PC Gamer team.
While you can manually tell your people what to do one thing at a time, that’s going to be a total waste of your time outside of combat. Ideally, you set your priorities right, give general orders, and let the game run.
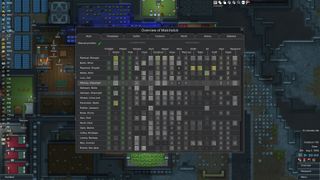
The Work menu: So, let’s talk the basics of how to get your colonists doing things. The thing you’ll want to keep fine-tuned is the 'Work' menu—that’s one of the tabs across the bottom of the screen. Here, you’ll see the things Colonists can do, from most important on the left to least important on the right, along with a check mark saying whether or not they’re allowed to do it.
This screen has two modes, but the one you want to use the vast majority of the time is 'Manual.' Manual lets you set each Colonist’s task priorities on a scale of one to four within the normal left-to-right priority system. That’s to say, they’ll try to do 1-rated tasks, then 2-rated tasks, and so on, until there’s nothing for them to do. Then they’ll stand around like slackjawed imbeciles waiting for a panther to murder them. (But you’ll get a notification that they’re idle.)
Set everybody’s priorities on 'firefight,' 'patient,' and 'flick' to 1. You’ll want to set Bed Rest to 2—but keep an eye out and make sure to manually rest any truly grievously injured Colonists.
To start, set your best Doctor, Warden, Cook, and Grow to priority 1 for the appropriate skill—then disable it for the rest of your Colonists. You can check a Colonist’s skill in a particular task by hovering over the box for it or by checking the 'Character' tab after you’ve selected them in-game.
At this point, I usually then set everyone else’s passions—that is, the categories where they’ve got a flame symbol of any size—to priority 2 or 3, depending on what I want them doing. Then set most everything else to priority 4, though make sure that someone has priority 2 on construction, preferably the person with the highest skill if nobody has a passion for it. These should serve you well for a while, though as you start to run low on wood you’ll likely have to crank someone’s Plant Cutting priority up a few notches.
You can have a colonist immediately carry out a task, wield a weapon, rescue a friend, kick a dying rabbit to death, or what have you by selecting that colonist and right-clicking on the item in question, which will bring up a context-sensitive menu. Test that right now by having your best shot pick up the survival rifle that’s somewhere nearby, your second best shot pick up the pistol, and the third unlucky schlub pick up the plasteel knife. Make sure the person with the knife has hunting turned off—in general, it’s a very bad idea to go hunting with a melee weapon. Even chinchilla bites can get infected.

Allowing and forbidding resources: You’ll notice that many of the items on the ground nearby are marked with a little red X. That means they’re forbidden—your colonists won’t interact with them, gather them, collect them, or wear them. To forbid or allow an object, you simply click it and use the button along the bottom or press F. Go ahead and allow all the nearby resources, like steel and wood. Somewhere else on that map there’ll be supplies of emergency “Survival Meals” as well—allow those too.
The Architect menu: Now, go ahead and dive into the 'Architect' menu. Nearly anything you’d like to do in the game is in here, from walls and doors to farming and building a ship to escape this miserable, plague-ridden ball of rock. Identify somewhere on the map you think you’d like to set up camp, preferably with some nice natural barriers nearby or with a bit of pre-built wall or ruins to make use of.
You can claim any structure you’re going to use under 'Orders,' then 'Claim' (It’s the little flag). This will add it to your colonists’ Home Area, which they’ll clean, maintain, and put out fires in. You may have noticed by now that mousing over various areas tells you if they’re indoors, outdoors, and their temperature in the bottom right. In the bottom left, you can see what your cursor is over, what floor that object is resting on, and the ambient light level. That might come in useful during the next step.
On the next page: learning how to obtain, use, and store resources.
Jon Bolding is a games writer and critic with an extensive background in strategy games. When he's not on his PC, he can be found playing every tabletop game under the sun.

If you love big trucks, establishing trade routes, and the phrase 'post-apocalyptic survival business simulator' then I've got just the strategy RPG for you

Blizzard veteran David Kim's strategy comeback with Battle Aces is 'very personal:' 'I just can't accept... the end-all peak of RTS is StarCraft 2 and nothing can ever be better'
Most Popular


