9 tips to get you started in Mortal Shell
Don't let Fallgrim get under your skin.

Delving into a new action RPG can feel disorienting, but I'm here to keep you grounded with a Mortal Shell guide. There's a lot to learn, and it's not like its residents will go easy on you just because it's your first visit. While Cold Symmetry's Souls-like is reminiscent of the well-trodden routes of Lothric and Lordan, your tools for surviving in this hostile realm are quite different.
My opening hours of Mortal Shell saw me get lost, misuse items, and die a lot. Taking a wrong turn too early or missing something valuable can put a downer on your experience, and make your playthrough harder in ways that might not be immediately clear. So, to save you from frustration, here are a few Mortal Shell tips to help you keep on track.
Visit Fallgrim Tower first
Fallgrim is an intriguing area to explore, but it's easy to get wrapped up in its mysterious surroundings and miss important NPCs and areas. Before toddling off into the unknown, prioritise a visit to Fallgrim Tower, your main hub in the opening zone.
From your first spawn, grab the Shell on the left, before bearing right and following the rocky corridor. Comb the camp on the right for a couple of items, then grab the Weltcaps on the left. Continue walking straight ahead for a few steps and you should be able to see the outline of Fallgrim Tower on the left. Run towards the tower and follow the grassy incline, keeping to the left so that you walk all the way around to the rear of the Tower. Look out for a small door with a torch outside to enter.
Sester Genessa helps you learn the name of your Shells and unlock their abilities. In the corner, you can switch between Shells. 'Sense Instinct' for the ones you haven't found yet for a helpful hint of where to locate them. Head up the stairs to find the Workbench, where you can upgrade your weapons and apply enhancements. There are spots for other weapons here, and you can 'Sense Instinct' to watch a brief vision showing where to find them, similar to Shells. It's also worth taking the final flight of stairs to remove the seal on the Old Prisoner. You're rewarded for your kindness with the Tarnished Seal, which allows you to Parry enemies.
Manage your meters
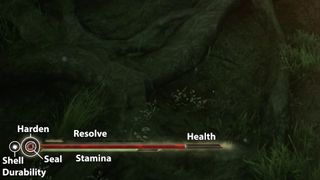
Paying attention to your HP and stamina is important in any Souls-like, but there are a few meters to keep an eye on in Mortal Shell. Knowing what you have at your disposal at all times ensures you won't take any unnecessary damage, for example. Each Shell also has different stats for each bar:
- Health: Red bar.
- Stamina: Green bar, used for attack and dodging.
- Resolve: Small yellow bars above Health.
- Harden: Circle to the left of Health and Stamina bars. It glows when available for use.
- Seal: Small icon within the Harden circle. Displays which seal you're using, for example, the Tarnished Seal.
- Shell durability: The white dot next to the Harden circle indicates that you'll awaken as the Foundling when you take lethal damage. This disappears once you're knocked out of your Shell for the first time.

The bottom-right corner of the screen is reserved for items. If you're playing on a controller, tap up on the D-Pad to use an item, and left/right to cycle between them.
The biggest gaming news, reviews and hardware deals
Keep up to date with the most important stories and the best deals, as picked by the PC Gamer team.
Use items, but experiment carefully
I'm a virtual hoarder when it comes to RPGs. If there's a chance that an item is even somewhat rare I'll collect as many as I can, squirrel them away, and then forget to use them. Mortal Shell encourages players not to make this mistake by introducing the 'Familiarity' mechanic. All consumables have a familiarity level that increases each time you use them, and unlocks additional effects. Item descriptions are intentionally vague to begin with, but you'll learn more about their properties as you continue to try them.
While you should get into the habit of using lots of healing items like Roasted Rats or Weltcaps early on, there are consumables that hurt before they help. Tarspores are orange mushrooms that deal 40 poison damage at Familiarity level 1, but they grant the user immunity to poison damage for two minutes once you reach Familiarity 2. Playing your lute also lures nearby enemies to your location, and by the time you reach Familiarity 10, you'll enrage them from much greater distances.

Missing your Estus?
Healing in Mortal Shell works very differently to the Souls games. Rather than having little pots to hand to top up your HP, you need to rely on consumable items and specific attacks for juice. Consumable items can be found in chests, on the floor, or sometimes looted from slain enemies.
Early on, you discover Weltcaps, which replenish 40HP over 60 seconds. With continued use these offer an effect that ensures you won't use stamina on your next dodge after consuming one. It's a good idea to pick up Weltcaps whenever you see them as they have a cooldown on their spawns, indicated by a white circle around the item. So, if you're in need of healing items and return to a Weltcap spawn too soon, you'll need to play carefully until the timer ticks down, or use your Empowered Riposte attack to drain health from an enemy.
Other healing items to look out for are Roasted Rats and Rotten Food, although both cost Resolve. Baguettes and Mangos also replenish HP, but they're much harder to come across.
You used Harden. It's super effective
While you can parry and dodge in Mortal Shell, blocking works slightly differently compared to what you're used to in Souls games. Here your character can Harden, which stops you from taking damage and staggers enemies that attack while you're in that state. You can hold the harden button to block incoming attacks, but you can also Harden while attacking and dodging.
Incorporating Hardening into strings of attacks helps you to make the most of your stamina as it regenerates while you're hardened. Your character's attacks are very slow, so hardening affords you more time to react. Keep in mind that there's a short cooldown on the ability (indicated by the circle on the bottom-left of the screen) and avoid relying on it too heavily.
Learn how to parry
As mentioned in a previous tip, healing items can feel scarce when you're taking on consecutive mobs, so learning how to parry is useful. The window is much smaller than Hardening, but if you can pull it off, you'll find fights a bit easier. Your Tarnished Seal glows when an incoming attack is unparryable so it won't take long to work out the best time to use it.
A successful parry while you have a bar of Resolve allows you to perform an Empowered Riposte that sucks a decent amount of HP from your victim. Practice on early enemies to get a feel for the timing, and be ready to use Harden in case you mistime it.

Collect the Shells early
Classes are called 'Shells' in Mortal Shell. There are four to find, and you can discover all of them early on in your playthrough. Each shell has different Durability, Stamina, and Resolve stats, alongside specific abilities that you can unlock with Tar and Glimpses. You need to learn each Shell's name before accessing their abilities, so farm Tar by killing enemies or consuming items, and speak to Sester Genessa once you have enough to unlock each one:
- Harros, The Vassal: 250 Tar
- Solomon, The Scholar: 500 Tar
- Eredrim, The Venerable: 500 Tar
- Tiel, The Acolyte: 500 Tar
To ensure that you're spending your hard-earned currencies on abilities that suit your playstyle, it's a good idea to find the Shells early and familiarise yourself with each beforehand.
Retrieve your Shell when it's safe
The first time you take lethal damage from an enemy, you're forced out of your Shell, before promptly awakening as the Foundling. You have very little HP in this state, but if you can safely recover your Shell without taking damage, you'll return with full HP. In these situations, it's tempting to rush towards your shell as soon as possible, but this isn't always the best strategy. You've got plenty of time to run back to your Shell, so take a second or two to lure your killer away and hop back into the Shell safely.
Watch out for bear traps
You need all the help you can get when taking on Fallgrim's foes. Chances are you've already stumbled into a stray bear trap or two on your travels, but have you considered using them to your advantage? You can be overwhelmed in seconds when encountering enemies in groups, but luring them into traps makes them more manageable to overpower. You can attract enemies with your lute, or stand behind a trap and wait for them to walk into it. Rush in for a few free hits while they're rooted to the spot to take them down quickly. Be wary of backing into traps yourself, though.
As PC Gamer's guides writer, Emma is usually juggling several games at once. She loves competitive first-person shooters like CS:GO and Call of Duty, but she always has time for a few rounds of Hearthstone. She's happiest when she's rescuing pugs in Spelunky 2.
Most Popular


