How To: Troubleshoot Your Home Network

Home network care and feeding
Most homes have an ever-increasing number of devices to connected to the Internet. On top of that, most of these devices, from desktops that utilize a Wi-Fi connection, to laptops, tablets, smartphones, and now the IoT (Internet of Things), we are increasingly dependent on having a stable wireless connection throughout and around our residences. When this all works, it’s nothing short of amazing, but when the Wi-Fi connection flakes out, it instantly becomes quite frustrating.
With some knowledge of home networking, the essentials of diagnosing a hiccupping wireless setup can be mastered. Along with that, it’s possible to fine-tune the network to maximize performance.
When the Wi-Fi goes on the fritz, the first thing to do is to reboot the modem, the router, and the end device, such as the laptop (hereafter referred to more properly as the wireless client). This time-honored move of rebooting all the devices resets all the connections, and reestablishes the connection to the Internet. When this doesn’t work is when things get more interesting, and a more methodical approach is indicated. While novices will focus on the wireless client to get things working, the educated move is to start at the source—specifically, to focus on the cable modem. Incidentally, while the majority of broadband in the United States comes from a cable provider, which requires a cable modem in a residential networking setup, this method can also be used for other types of ISPs (Internet service providers), such as DSL or fiber setups.

Speed metrics
The first thing to do is look at the broadband that is supplied from the ISP. While it is intuitively obvious that the Internet needs to be supplied correctly, it is a common mistake to not start with this. The best way to verify the connection is to disconnect the router from the modem, and to connect a computer directly, via a wire to the LAN port on the modem. If your desktop is not next to the modem, most notebooks have an Ethernet port, and can be used for this purpose. Remember to reboot the modem before making the physical connection, and make sure the LED’s go on for the modem.
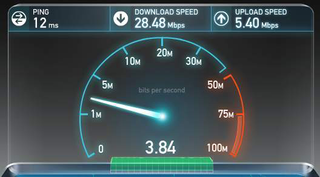
The first thing to check is whether the computer can connect to the Internet at all. The next thing to do is check the network speeds provided by your ISP. You can be check this by using a browser-based tool, such as www.speedtest.net, which can provide both a download and upload speed. This should then be compared to what your ISP should be providing via your broadband plan. If for some reason you don’t know which speed tier you’re on, check your cable bill or call your ISP directly to verify your plan speeds.
If the computer doesn’t connect to the modem, verify that all the connections are fully made and tight (a small wrench can be used on the coaxial cabling connection), where the cable from outside connects to the modem. Double check that the Ethernet cable is fully seated from the modem to the computer, and the spring clip is completely inserted and seated. A second Ethernet cable can be exchanged between the modem and the computer to verify that the wire is not the issue. You can try using a second computer to ensure that the issue is not with the Ethernet port on the first computer. Also make sure the modem is powered on, and keep in mind that it will generally take a few minutes for it to boot. If all of this is done and the computer still will not connect to the Internet, then the issue is either with the modem itself or with the signal upstream from your ISP. It’s time to call your ISP; they can run a line test to look for an issue on their end, and advise on whether it’s time to replace the modem, or if a tech visit is required to work on issues on their end. Put simply, these are not user-serviceable issues.
In other situations, the modem will boot and there will be a connection, but the network may running slowly or inconsistently. Again, speeds can be verified by using Speedtest.net from a computer directly attached to the modem via a wire, with the router disconnected. While calling the ISP is certainly an option in this scenario, there are some items that can be looked into by the more tech savvy user.
The biggest gaming news, reviews and hardware deals
Keep up to date with the most important stories and the best deals, as picked by the PC Gamer team.

The splitter
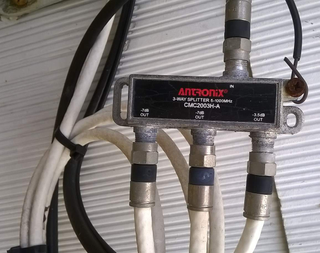
The splitter is a frequent failure point in a cable setup. Many users take advantage of “Triple play” deals to receive their Internet, TV, and phone services from a single provider. The single wire run from the utility pole (at the top with the black wire, labeled “IN”), gets split to supply connections to the cable modem and set-top video boxes (at the bottom with the white wires, labeled “OUT”).
The splitter can cause issues via two different mechanisms. The first is that it is outside, and with continuous exposure to the elements, it can start to corrode. With several signals going through this splitter, it can easily compromise the connection. The fix is to replace the splitter, with some cable providers offering exchanges of the splitter for no additional cost. When techs are called out for Internet speed issues, replacing the splitter is often one of the first things they do.
The other issue is that the splitter does not divide the signal equally. If we look carefully at the three “OUT's,” we can see that two are -7 dB, and the last one on the right is -3.5dB. The splitter is designed so that the modem gets the stronger signal, and therefore should be connected on the -3.5dB limb of the splitter, with the -7dB limbs for TV set-top boxes. In some cases, the splitter is not installed correctly, and this should be fixed as it can contribute to issues.

The modem
The modem is where the signal from the ISP gets converted and run into the Ethernet cable that can plug into a computer or wireless router. It is crucial to have an up-to-date modem that has all the channels that the ISP is supplying. The modem also has a page that can supply diagnostic information. On most modems, this is accessed by entering this address into a web browser: 192.168.100.1
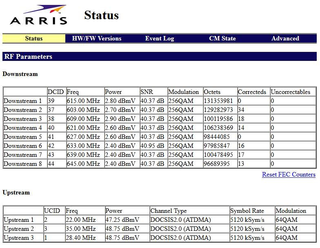
This gives us a direct look into how the modem is performing. Start by looking at the downstream, and note that there are eight downstream channels. This tells us about the signal received from the ISP, and should be within -15dBmV to +15dBmV at a maximum, and ideally within -10 to +10dBmV. In the example screenshot above, we can see that all the signal levels are within these specs.
Next, we’ll turn our attention to the upstream levels. This is a measure of the power your modem is requiring to push your data back to the cable provider. Looking at the screenshot, we can see that there are three channels for this on this modem. The power levels should be between +35 to +52dBmV, and in the example shown they’re within these levels.
Another item to look at is the “SNR,” which is the signal-to-noise ratio. This tells us how clean the signal is, with a higher number preferred. The SNR should be over 27 in 64QAM or greater than 32 in 256QAM, because at lower numbers there can be issues with packet loss.
The last thing to look at on the modem info page is the error rate. This is quantified as the “Correcteds,” and the “Uncorrectables.” It’s normal to have a few packets of corrupted data received by the modem. In some cases, the data can be reconstructed via an algorithm, hence the term Correcteds, but sometimes it is corrupted beyond repair, and this is termed Uncorrectables. There is no hard and fast number for this, but the lower the better, with a rule of thumb being that the Correcteds and the Uncorrectables should be less than 10 percent of the octets, which is a measure of the amount of data sent through the modem.

Wireless interference
With the other parts of the network looked at, the remaining piece is the wireless component. There can be many sources of wireless interference, including cordless phones, cordless mice, Bluetooth devices, baby monitors, microwave ovens, and even Christmas lights. With all of these sources of wireless interference, it’s important to account for surrounding Wi-Fi networks, and to optimize this aspect.
This process starts with software that can detect surrounding networks. For this example we’re using Vistumbler, which is a freeware program for the Windows platform. A tablet or smartphone can also be used to detect competing networks, and there are apps available on both Android and iOS.
In the screenshot above, networks #1 and #2 are both from the same router at our residence. This gives us an idea of how strong our home network is, relative to our neighbors, by looking at the signal strength. By seeing that our network is the strongest one detected from within the house, we’re off to a good start. In situations where you have a weaker router on a lower level, and your neighbor has a more powerful router on their upper level, this may not be the case.
Next, we look at the channels. In the first line, we see Channel 44, which is on the newer 802.11ac network and runs on 5GHz (in the United States, the 5GHz channels start at 36 and go up). Notice also that none of the surrounding networks use any 5GHz channels, and it becomes obvious that this is wide open, interference free, and why we do our networking on the 5GHz frequency when at all possible. This is fairly typical, given that many users are still using older wireless networking gear. Also, on the 5GHz frequency, there are 23 non-overlapping channels, giving a good chance that there will be a free one in all but the most congested areas.
While 5GHz is preferred, many devices still can only use the older 2.4GHz frequency. While there are 11 channels of Wi-Fi on this frequency (for the United States, in Japan they go up to 14), as they are closely spaced, there are really only three non-overlapping channels: 1, 6, and 11. Most current routers offer a Channel Autoselect feature that will allow the router to choose a free channel, but in the screenshot shown most of the networks are on Channel 6, while none are using Channel 1. In addition, Channel 7 will also cause interference with Channel 6 as they overlap. The best move here would be to manually change our router to Channel 1 to avoid any interference on this 2.4GHz frequency.
Keep it snappy
Internet connection issues remain a frustrating problem. Contributing to the challenge is that a well run network will require routine attention and maintenance. By understanding the various components of a residential network, including the modem, router, and splitter, the network can be optimized to provide the best experience for all users. The time you spend on a bit of maintenance can have substantial speed rewards.
Most Popular

