How to make a keycap puller from two paperclips and not break your keyboard
Put together a cheap keycap puller with a pair of paperclips, a twist-tie, and pliers.

In order to thoroughly clean your mechanical keyboard, you may want to remove the keycaps. The best way to do that is with a keycap puller, but keycap pullers are one those mysterious objects that I always swear I have in a drawer somewhere but can never find. That shouldn't halt a summer project, though, whether you want to clean the gunk out of your board or replace your old crusty keycaps with some fancy new ones. You can just make your own keycap puller with stuff you probably have lying around.
I decided to use the HyperX x Ducky One 2 Mini's keycap puller as a design inspiration for the one we're making today. It's small and easy to store along with being the right size for yanking off any sized keycap.
The reason you want to use a keycap remover instead of your clumsy fingers is that you don't want to risk damaging your keyboard by breaking a stem. A keycap remover acts as a pair of tongs that slip underneath the key allowing you to safely pull it off with a vertical motion and no side-to-side wiggling. Mechanical gaming keyboards can costs upwards of $150, so why risk breaking it over something as trivial as using the right tool?
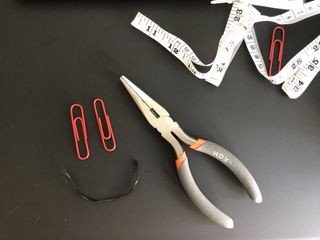
The only things you'll need for a quick and dirty keycap puller are:
- 2 x paperclips
- 1x twist-tie
- Pliers
- Ruler (optional)
You could try to eyeball the bends you'll be making with the pliers, but a ruler will help in making sure those bends are precise enough to fit over your keycaps. The average paperclip is about six inches long when straightened out.


1. Straighten out the paperclips
Step one is pretty self-explanatory. You want to completely straighten out the paperclips, which will make it easier to get the bends you want with the pliers. The pliers will also help in straightening out the segments you can't do with your fingers.
2. Let's get bending
This is the part that will require some precision. In each paperclip, we are going to make two 90-degree bends with 1 cm between them, so that the paperclips resemble long rectangles with one missing side (see the gallery above). The easiest way to do this is to hold the paperclip in place with the pliers and push on the clip with your thumb.
The biggest gaming news, reviews and hardware deals
Keep up to date with the most important stories and the best deals, as picked by the PC Gamer team.
3. More Bends
Your two puller pieces should look like staples with very long legs. Now take the ends of each puller and make 90 degree bends that face outward, like the feet of a stretched-out omega (Ω).
4. Tie it all together
Lay the two bent paper clips on top of each other. Scrunch together the feet and wrap the twist tie around them, tying them together. Go around twice. From here, wrap the ends around each foot. It should resemble a cute little handle. If you have any excess bit of the paper clip sticking out, you can use the pliers to snip away at it.
There you have it, with about ten minutes' work and virtually zero cost, you made yourself a keycap puller. Now go clean that keyboard!

Jorge is a hardware writer from the enchanted lands of New Jersey. When he's not filling the office with the smell of Pop-Tarts, he's reviewing all sorts of gaming hardware, from laptops with the latest mobile GPUs to gaming chairs with built-in back massagers. He's been covering games and tech for over ten years and has written for Dualshockers, WCCFtech, Tom's Guide, and a bunch of other places on the world wide web.
Most Popular


