How to create SweetFX-style shaders that don't affect the HUD with Durante's GeDoSaTo
In 2012, Peter "Durante" Thoman wrote the popular mod DSfix for Dark Souls: Prepare to Die on PC. In April 2014, he wrote a series of articles for PC Gamer about modding Dark Souls 2 .
About 3 months ago, at the same time as the PC release of Dark Souls 2, I released a new tool called GeDoSaTo . At first, it primarily focused on offering a set of graphical enhancement for DS2, but also supported downsampling in a limited set of DirectX 9 games. Since then, its scope and applicability have expanded greatly. Dark Souls 2 is now just one plugin rather than the main focus, compatibility has increased greatly—at this point in time it's more likely for any random DX9 game to be supported than not—and new, higher quality downsampling algorithms were added.
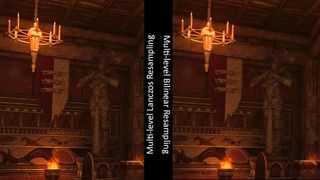
One example is Lanczos downsampling, which preserves/enhances small-scale detail, as you can see in this example - a cropped 5120x2880 to 1920x1080 downsampling from Might & Magic X: Legacy:
Crucially, the full source code for GeDoSaTo is now available on GitHub , and I welcome all contributions, including bug-fixes, feature or compatibility enhancements and new game profiles. And this is where this article comes in—it is not necessary to know any programming to make significant enhancements to specific games, thanks to the power of the generic plugin. GeDoSaTo's generic plugin offers all the widely popular functionality of injectors such as SweetFX —SMAA injection, high quality tone mapping, HDR effects, color, contrast, sharpness and gamma adjustments and more—but better, as it allows you to target the application of those effects exactly to where they are needed, while not affecting UI elements or the HUD of games . This article will teach you how to use these capabilities in your own games, and walk through the entire process using Mass Effect 3 as an example.
The Generic Plugin
With GeDoSaTo becoming more general, there was a need to be able to target individual games without polluting the entire codebase. The solution is a plugin system, which allows for plugins written in C++. However, while that is a very powerful solution, it is overkill for most uses and requires some familiarity with programming.
The Generic Plugin is automatically used whenever GeDoSaTo is launched with a game for which no specific plugin exists. It supports the following features:
- Downsampling from arbitrary resolutions (the fundamental purpose of GeDoSaTo).
- Injecting either SMAA or FXAA post-processing anti-aliasing.
- Customized image post-processing shaders.
- Post-processing, AA and screenshot targeting to individual pixel shaders.
Points (1) to (3) are rather simple and straightforward to use. Select the desired settings in the configuration file, optionally edit the shader files and you are set. Of course, the same types of post-processing can also be achieved using SweetFX.
The biggest gaming news, reviews and hardware deals
Keep up to date with the most important stories and the best deals, as picked by the PC Gamer team.
Point (4) is where GeDoSaTo distinguishes itself. When you use a SweetFX injector to add some post-processing effects, they will always be applied to the final rendered image, which means that the HUD and various UI elements will be processed as well. Particularly with FXAA and heavier post-processing this can be quite detrimental to the image quality of UI elements, especially that of text. The following image shows the menu screen of Blackguards, both with and without FXAA and post-processing.
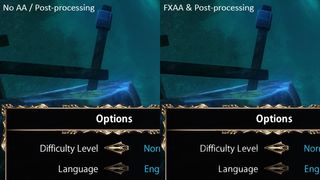
As you can see, the injected processing greatly improves the quality of the rendered background elements and cleans up their edges nicely, but it also reduces the clarity of the text and even introduces some artifacts in the 2D elements. This means that when you use a SweetFX injector to change color saturation or add AA, these changes affect the UI as well—and often be detrimental to its quality, as in the example above.
Ideally, we would inject post-processing which only affects the rendered image, but not the HUD/UI elements—and that is exactly what GeDoSaTo provides. In the rest of this article, I'll walk through the steps of creating game-specific post-processing plugins that will only affect a game's graphics, not its UI.
Getting started with game-specific GeDoSaTo profiles
As an example game, I picked Mass Effect 3 to demonstrate the process of implementing HUD-less post-processing. The first order of business if you want to try a new game (after downloading the latest version of GeDoSaTo ) is adding the game's executables to the whitelist. The whitelist is checked by GeDoSaTo, and only programs entered in it are affected. So, start GeDoSaToTool and press the “Edit Whitelist” button:
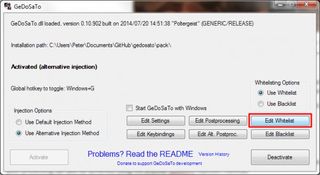
This brings up a text editor, which allows you to add executable names—or patterns to match multiple files—to the existing list.
For Mass Effect 3, we need to add “MassEffect3Config” and “MassEffect3”—you can usually find these names by navigating to a game's installation directory. Note that the whitelist also allows you to enter an additional name for each listed program—in the case of ME3 this is hardly necessary, but it helps for more obscure files such as “lcgol” or “EoCApp”.

After editing the whitelist, you can press “Sort Entries” to have the entries automatically sorted, and don't forget to save, either with the button or by pressing Ctrl+S. Now we are almost ready to go, but to investigate how to perform HUD-less processing we still need to enable frame dumping (this allows us to record the rendering process of the game, which we will need to identify when exactly we want our injection to happen).
In the “Edit Keybindings” dialogue, enable the “dumpFrame” keybinding by uncommenting it like so:
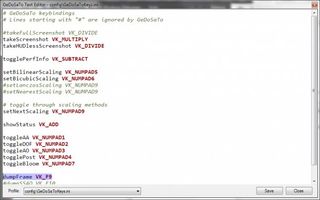
A big dump
After this preliminary setup, it's time to start building a plugin for Mass Effect 3. First, I suggest configuring the game to run at a low resolution, such as 1280x720, and in windowed mode. This is not strictly necessary, but greatly speeds up the overall process. Also, make sure to enable all the graphical settings you want to use later when playing, as changing them might change the shaders the game uses and render all our subsequent findings obsolete.
Once you have started the game, you can press the numpad “+” key to make GeDoSaTo report its status, in order to make sure that the previous configuration additions were successful. For our Mass Effect 3 example, the result will look like this:
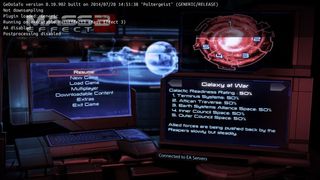
Now, load a saved game and get into a situation where some distracting HUD is shown. For the example, I chose this scene:
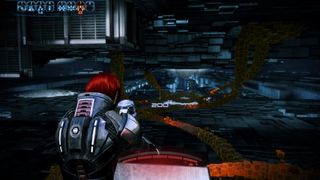
The next step is to press the key bound to the “dumpFrame” action (F9 by default), which causes GeDoSaTo to write out a detailed log of all the relevant rendering actions performed by the game for the next frame, and also an image dump of the current buffer at crucial points. Now might be a good time to brew a nice cup of tea, make a sandwich, check your favorite news site, or perhaps all of the above. What I mean to say is that this process will take a while.
After it has finished, all the information required to achieve HUD-less post-processing and screenshot taking is at our disposal. In particular, what we need is the most recent log file—created in the “log” subfolder of the GeDoSaTo installation directory—and the image dumps generated in the “tmp” folder.
Most Popular


