
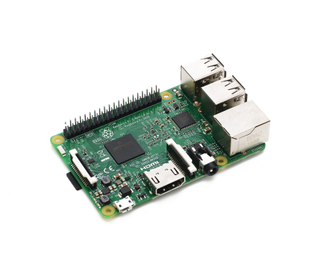
A Raspberry Pi 3 or Zero W The third iteration’s built-in Wi-Fi is what makes this project work.
Why should your wireless router have all the fun? Gaining access to your network— and through it, the internet—is something you can do via a properly configured Raspberry Pi. This means you can easily extend the functional wireless range of your network with a little Ethernet cabling, build an access point especially for guests, or just add a handy new SSID to your home. And because your Pi access point will be built on top of Linux, using tried-and-tested tools from the more hardcore end of the software spectrum, you’ll get all the control you could ever want over who accesses your network and precisely how it operates.
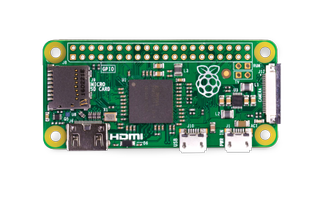
Note that we require a Raspberry Pi 3 or Zero W for this project (see image below), and are basing it around the slightly larger third edition. This is entirely down to the Pi’s slightly lacking USB bus; adding a wireless module to an earlier edition severely affects the potential network bandwidth, because the USB and Ethernet ports share the same data rail, but later models build Wi-Fi onto the board. You could still employ the services of a Pi 2B or similar, but you may get disappointing results.
Start fresh
It’s a common refrain when starting a Raspberry Pi project, but there are so many tiny variables involved in every Linux installation that we heartily recommend starting from scratch to make sure you’re on precisely the same page. So, whip out your microSD card (or grab a new one), and insert it into your PC’s card reader. Download a clean copy of Raspbian Stretch—you don’t necessarily need the desktop version, as everything we’re going to do is command-line-based, but we’re grabbing the full version just in case—then unzip the file, and put the ISO somewhere you can find it.
Next, find your SD writer of choice—we lean toward Rufus (see below image)—and write the file to your card. You’ll lose any data that was on there before. Plug your Pi into an Ethernet connection, slip the card into your Pi, power it up, and get yourself booted up.

Update and download
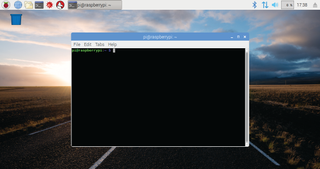
A freshly installed Raspbian system (see image below) isn’t an up-to-date one. Either launch a terminal window from within the Raspbian PIXEL desktop, or drop out of the desktop to a tty console with Ctrl-Alt-F1. If you’re using the lite version, you’ll already be at the tty console. Next, for a little added security at this early stage, change your password by typing 'passwd'. The default password on the account “pi” is “raspberry” so type that when prompted (it won’t be displayed on screen), then enter your new choice.
Now type 'sudo apt-get update' (giving your new password if prompted) to refresh Raspbian’s list of current packages, and 'sudo apt-get upgrade' to download the latest version of every package on your system that isn’t currently up to speed. This will take a while, because everything is compiled on the Pi’s somewhat slow hardware at install time.
There are a few packages we’ll need that aren’t installed by default, so pull them down with 'sudo apt-get install dnsmasq hostapd', then ensure neither dnsmasq (which handles DNS, DHCP, and router advertisement) or hostapd (responsible for wireless management and authentication) are running by typing 'sudo systemctl stop dnsmasq' and then 'sudo systemctl stop hostapd'. They’re not configured yet, so it’s best to fire them up later, once we’ve done the dirty work.
The biggest gaming news, reviews and hardware deals
Keep up to date with the most important stories and the best deals, as picked by the PC Gamer team.
Stabilize wi-fi
Check a couple of things before we move on, because your results may differ. Type 'ifconfig -a -s' into your terminal, and note down your network device names. By default, these should be wlan0 and eth0, but if they’re not, you’ll need to replace them in the following steps to match your own configuration.
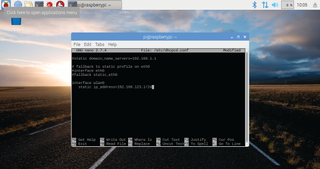
Run 'sudo nano /etc/ dhcpcd.conf' to open up the configuration file for the Pi’s DHCP client, and head to the bottom of the file. Add the line:
'interface wlan0'
Then below it add:
'static ip_address=192.168.123.1/24'
This will fix your Wi-Fi address in place (see image below).
We’re using a different subnet (represented by the third digit, in this case 123, though you can set this to any valid value), but bridging—and using your router’s existing DHCP and DNS features—is entirely possible if you install bridge-utils and use 'man bridge-utils' to check out its manual. Quit nano with Ctrl-X, answer yes to saving the file, then run 'sudo service dhcpcd' restart to put your new configuration in action.
Set up dnsmasq
We need to tell dnsmasq a few things about the access point we’re trying to set up, but our limited network doesn’t need half of the information that’s found in its default configuration file. Rename the one that’s there with 'sudo mv /etc/dnsmasq.conf /etc/dsnmasq.conf.old', then use 'sudo nano /etc/dnsmasq.conf' to start editing a blank replacement. We’ll only need three lines.
First:
'interface=wlan0'
This tells it which device to use.
On the next line, add our definition of what dnsmasq is expected to provide:
'dhcp-range=192.168.123.2,192.168.123.40,255.255.255.0,24h'
In order, this tells dnsmasq the start and end of the IP address range to allocate (you can tweak this), the subnet mask (leave this alone), and the lease time, in hours, to give to connected devices.
Quit nano and save, and that’s really all you need to do to get dnsmasq set up. While there’s a raft of potential options listed in dnsmasq’s manpage, it’s not worth exploring them until you’re confident everything works as it should. Break it later.
Set up Hostapd
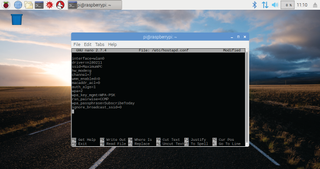
With network routing cemented and local IP addresses ready to be dished out, it’s time to deal with the more difficult part: wireless authentication. Hostapd doesn’t come with a default configuration file, so start editing one with 'sudo nano /etc/hostapd/hostapd.conf'. Note that the following variables, which you can edit later on to suit your particular network, need to be added line by line, with no spaces at the beginning of lines.
We’ll first define which device we’re managing:
'interface=wlan0'
Which driver we want to use:
'driver=nl80211 is Pi’s default'
And what we want our network to be called:
'ssid=MaximumPC'
Next comes a little hardware definition. Add this to use the 2.4GHz wireless frequency:
'hw_mode=g'
Then:
'channel=7'
Or whatever the clearest network channel in your area is, to set the access point’s wireless channel.
'wmm_enabled=0'
To disable wireless multimedia extensions for now. And:
'macaddr_acl=0'
To state that you don’t want to use a MAC address access control list.
Now let’s set up a little security. Include:
'auth_algs=1'
To specify that you’re running in WPA mode. Then:
'wpa=2'
To use WPA2 specifically. Use:
'wpa_key_mgmt=WPA-PSK'
'rsn_ pairwise=CCMP'
To set a few crucial parameters. Finally:
'wpa_ passphrase=SubscribeToday'
That or any other string of characters between 8 and 64 characters will define your WPA password.
Once you’ve saved the configuration file (above image), you need to tell hostapd where it is; type 'sudo nano /etc/default/hostapd' at the shell. Replace the line beginning #DAEMON_CONF with:
'DAEMON_CONF="/etc/hostapd.conf"
Start up and translate
Those processes we stopped earlier can now be started again, using 'sudo systemctl start hostapd' and 'sudo systemctl start dnsmasq'. At this point, we could technically reboot and get the access point up and running, but we’re still missing some crucial internal tweaks. Firstly, we need to enable IP forwarding by opening /etc/sysctl.conf and removing the # symbol to uncomment the 'net.ipv4.ip_forward=1' line, before saving the file.
Next, we need to implement something called a masquerade. This is, broadly, a specialized network address translation algorithm that routes traffic between devices without disrupting the original packets in any way.
Run 'sudo iptables -t nat -A POSTROUTING -o eth0 -j MASQUERADE' to set it up, routing outbound traffic from eth0 onward on to your network. We now need to make sure that iptables runs the same way every time.
You can use the iptables-save routine to drop its variables into a file with 'sudo sh -c “iptables-save > /etc/iptables.ipv4.nat" '. Now let’s set these rules to run every time the Pi boots up, by opening /etc/rc.local and adding 'iptables-restore < / etc/iptables.ipv4.nat' just above the line that says 'exit 0'.
Reboot and test
You can now safely reboot your Pi, either through PIXEL’s graphical interface or by typing 'sudo reboot' into the command line. You’ll probably see an alert about some configuration files being overwritten—this is as a result of our earlier upgrade, and the configs you’ve set should be safe. All being well, everything will have fired successfully. Try a few things to make sure. Boot up a Windows machine (or your cell phone), and search for local networks; you should see your new SSID showing up. Connect to it, with the password you set earlier, and you should be able to access the internet through it.
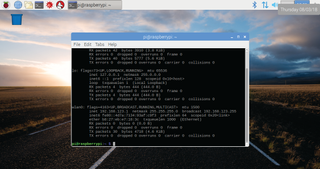
Back on the Pi, run 'ifconfig' in a terminal window; you should see the wireless interface (see above image) has been given an IP address. If you have any problems—and yes, this is small consolation given that you’ll need to interpret Linux error messages—you can try a few things.
Try manually starting hostapd and dnsmasq, and look out for any alerts. If they both seem to work and yet your network does not, run 'sudo hostapd -dd /etc/hostapd.conf > /tmp/hostapd.log', hit Ctrl-C to kill the process after 10 seconds or so, then run 'nano /tmp/ hostapd.log' to see hostapd’s detailed diagnostic output.
Tweak it
So, you’ve got your own wireless access point. What can you do with it now? Carefully editing the hostapd.conf file gives you a lot of options to make it your own. Add the line 'ignore_broadcast_ssid=1', for example, to hide the Pi’s SSID and keep your network private, or save some processing overheads and remove the WPA security altogether, as long as you’re masochistic enough to allow an unsecured access point to run on your network. Your guests will thank you, but your ISP won’t.
While we wouldn’t leave it open, the Pi is the perfect host for a guest network. You can hand out a password without giving up your main details, and it’s even possible to restrict network throughput to stop your guests from bruising your main connection—see “Traffic shaping” for a little more on this. You’re also now safe to run your Pi completely headless, because it will retain the same IP address.
Before you unplug, though, make sure SSH is switched on by running 'sudo raspi-config' and heading to “Interfacing Options > SSH.” When it’s running, reboot your Pi, unplug it from the keyboard, mouse, and monitor, then use PuTTY to connect to and administer it from your Windows machine. You won’t get a pretty interface, but we suspect you’ll be able to cope without.

Viable alternatives
A Raspberry Pi 3 makes a reasonable access point, but it’s not great—and it’s unlikely to ever be, because the Pi is not specialty hardware. If you want an AP that you can tinker with and configure to within an inch of its life, routing hardware that supports a flavor of firmware-replacement WRT—be it OpenWRT or DD-WRT—is perfect.
There’s a long list of compatible hardware here, including, if you look carefully, the Raspberry Pi. Again, don’t expect blistering performance, but if you want to put together a specialized AP without spending hours fighting with tetchy config files that could break your whole setup in an infuriating instant (not that we’re speaking from experience at all), the mature OpenWRT is worth poking at. Just make sure you download the correct version for your hardware: for the Pi 3, that’s bcm2710.
Traffic shaping
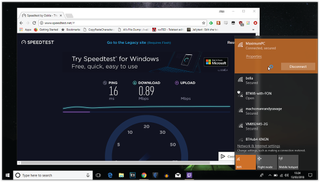
If you’re planning to use your Pi as a guest network, or if you want to slow down your uploads to stop your download speeds taking a dive, Wondershaper is a great tool. It’s tiny—really, it’s just a 15kb script—but immensely powerful if you’re looking to control the speed that traffic can move through your hardware. Begin by downloading it from the Pi’s standard repositories using 'sudo apt-get install wondershaper', at which point you can go ahead and run it for the first time with 'sudo wondershaper eth0 1024 1204'. This command restricts the download (first value) and upload (second value) of the Pi’s Ethernet connection to an entirely unreasonable 1,024kb/s.
You can check that it’s working with 'wondershaper eth0', or by running a speed test at, for instance, here. (see image above). This script is perhaps most useful if run at boot time, so (and, admittedly, this is a slight cludge) run 'sudo nano /etc/rc.local' and add '/sbin/wondershaper', followed by your preferred restrictions, then save the file, and reboot. If you ever want to stop Wondershaper’s actions, just run 'sudo wondershaper clear eth0' to clear its current parameters, or remove it from /etc/rc.local to stop it running automatically.
Building bridges
Our main tutorial leads you to building, essentially, a self-contained network. One with its own subnet, its own range of IP addresses, and its own DHCP management. Devices you connect to it gain access to the internet, and you get pinpoint control, but its isolated structure may not be entirely ideal. Building a network bridge instead leaves a lot of that hard work up to your router, and makes your access point far more of an extension of your existing network than a mini network unto itself.
We still need hostapd to deal with the wireless authentication side of things, as well as Debian’s bridge-utils package, installed via 'sudo apt-get install hostapd bridge-utils'. Stop hostapd ('sudo systemctl stop hostapd'), then open up the dhcpcd configuration file for editing with 'sudo nano /etc/dhcpcd.conf'. Because our bridge will be the logical network device, rather than either the Pi’s Ethernet or WiFi modules, we now need to stop them from receiving their own IP addresses by adding:
'denyinterfaces wlan0'
'denyinterfaces eth0'
To the end of the file, on separate lines. Save the file and exit back to the shell.
Now we’ll add our bridge—again, this is virtual network hardware, the Pi acting as a go-between for our network ports—by typing 'sudo brctl addbr br0', and then connect it to our Ethernet port with 'sudo brctl addif br0 eth0'. With the two hooked up, we need to define the bridge interface a little more clearly by running 'sudo nano /etc/ network/interfaces'.
Scroll down to the bottom of the file (there’s a good chance it won’t be too long), and add the following definitions line by line.
First:
'auto br0'
To bring the interface up at boot time.
'iface br0 inet manual'
To tell the bridge that we want the router’s DHCP service to deal with assigning it an IP address. Finally:
'bridge_ports eth0 wlan0'
To tell the bridge precisely what you want it to do—that is, sit between the Ethernet and Wi-Fi devices, and bridge all network ports between them.
The final step, once the interfaces file is saved, is to open up /etc/hostapd/ hostapd.conf and write your configuration file. Follow the steps under “Set up hostapd” in the main tutorial, but instead of including the line 'driver=nl80211', drop in 'bridge=br0', telling your access point to connect you to the bridge adapter. Save, reboot, and use 'ifconfig' to test whether your bridge is now active; it should be the only device assigned an IP address.
This article was originally published in Maximum PC issue 151. For more quality articles about all things PC hardware, you can subscribe to Maximum PC now.
Most Popular


