Destiny 2: Where to find Atlas Skews and the Fractethyst Stasis Shotgun
Don't go chasing Garden Waterfalls.

The next Tracing the Stars activity is now available in Destiny 2 and this week, you're looking for Atlas Skews. If you missed last week's challenge to find the Vulpecula hand cannon, you can check our guide here. You can pick this quest up from the H.E.L.M. and then it's off to The Strand to search for five Atlas Skews. The descriptions are deliberately vague, so here's where you need to look to find them all.
Destiny 2: Where to find Atlas Skews
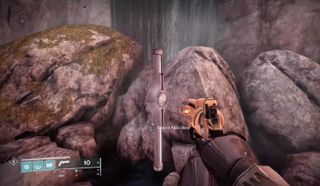
It's back to the Dreaming City once again and you're heading towards The Strand area of the map. The Atlas Skews look a bit like white poles with orbs in the middle and they'll be marked by waypoints when you're close enough. You'll need to head towards the Towering Statue that overlooks where the regular Rift Generator Public Event spawns—it's near the big floating orbs. Climb up it to find the first Atlas Skew.
Next, you're off to the Gazebo Tower, which you can find by heading east from the previous location. Climb up and around the rock wall on the furthest left side of the Gazebo Statue to reach a rocky tower to find the second Atlas Skew. Petra sometimes spawns here, so it should be quite familiar to you.
After this, it's time to head towards the Aphelion Brazier. From the Gazebo Statue, jump down towards the Aphelion's Rest Lost Sector. Complete it to find the Atlas Skew in the boss area behind a brazier.
For the final Atlas Skews, you'll need to head to the Garden of Esila. The most straightforward way to get there is to spawn back at the Divalian Mists and head towards The Strand again. Once you reach the Towering Statue, turn right and follow the path up the hill before turning right again, passing the temple. There's a path you can follow through the gardens that lead to an area with many trees and you'll spot a big waterfall to the right. Head towards the Garden Waterfall and you'll spot the fourth Atlas Skew here.

The final Atlas Skew is near the Garden Bridge Tree. Head up to the bridge that leads to the large building and make your way towards the big tree. It'll be waiting there for you. Once you've got all five, head back to the H.E.L.M. and select the A Hollow Coronation quest. Uldren will wax lyrical for a minute and Mara will share some Awoken lore with you, then you can pick up the Fractethyst Stasis Shotgun from the Wayfinder's Compass.
The biggest gaming news, reviews and hardware deals
Keep up to date with the most important stories and the best deals, as picked by the PC Gamer team.
The first three games Lauren played on PC were Star Wars: X-Wing, Zoo Tycoon and Barbie Fashion Designer, which explains her love of all things space, strategy and aesthetically pleasing. Lauren recently took over as PC Gamer's Guides Editor after three years of writing many dozens of Destiny 2 guides at VG247, as well as casually trying to shoehorn in The Witcher 3 articles wherever possible. When she's not trying to force everyone to play as a Warlock in Destiny 2, Lauren is either mastering her SEO abilities to help smash the competition, or patting one of her red sons.
Most Popular


