I performed brain surgery on my CPU to lower its temperature 15 degrees
Delidding your CPU is scary, but worth it—and surprisingly easy! Here's how I did it.
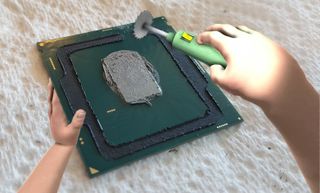
If building your first PC is like graduating from high school into adulthood, delidding your CPU is probably like surviving med school. It's a delicate, high-risk operation that, if successful, can grant you much lower CPU temperatures and potential for more overclocking headroom, but only the most dedicated PC overclockers attempt it. Why? Because it requires slicing your CPU in half with a razor blade, and one slip means $200+ down the train. Or at least, that's how it was until two years ago, when overclocker der8auer invented a tool called the Delid-Die-Mate to make delidding both painless and idiot-proof, no razors required. Naturally, I had to try it.
If you're not familiar with delidding, a quick primer: the "lid" on the CPU is its integrated heat spreader, or IHS. It's that silver part that sits on top of the thin PCB. It's really just a hunk of metal meant to absorb and transfer heat from the CPU die (the actual circuitry making all the computer things happen) to your heatsink (the air or liquid cooler you place on top of the CPU socket). Delidding is the act of detaching that head spreader and replacing the thermal material Intel used between it and the die with a different thermal material that better conducts heat. Put it back together, and voila: lower temperatures.
I set out to delid my i7-7700K, a CPU known for hitting some pretty high temperatures. My takeaway, after spending a careful hour or so taking my CPU apart and putting it back together, is it's a scary process, but not nearly as dangerous as it feels.
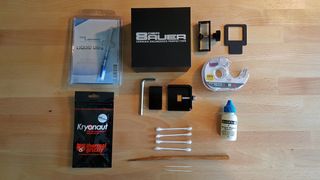
These are the tools I assembled to do the job:
- Der8auer's Delid-Die-Mate 2 - Better than a razor blade.
- Coollaboratory Liquid Ultra - a liquid metal thermal material that's so good, it's almost as cool as the T-1000. For use on the CPU die.
- Thermal Grizzly Kryonaut - The best conventional thermal paste, according to some exhaustive testing by Der8auer. (If you haven't figured it out by now, he knows his stuff).
- Thermal paste removal material - A fancy alternative to rubbing alcohol.
- Scotch tape - For protecting the CPU die.
- Q-tips, toothpicks and a chopstick - For spreading the Liquid Ultra and scraping away the IHS glue. I didn't end up using these much, as a credit card felt safer for scraping and the Liquid Ultra comes packaged with its own brushes, which I didn't know going in.
The delidding process
Now for the procedure. The patient was healthy, and required only a quick cleaning after I unscrewed my NZXT Kraken X42 cooler and removed it from the socket. The first step feels a little scary, since you're putting a delicate component into a hunk of metal and tearing it in half, but turns out I had nothing to worry about.
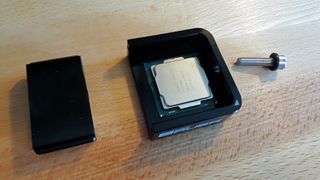
The Delid-Die-Mate is really an incredibly simple tool that replaces the risky razor blade method. It's a hefty hunk of metal, built to withstand the serious amount of force required to dislodge the heat spreader (which is attached with some heavy duty glue). You place your CPU in the DDM's socket and then slot in the slider, attach it to a screw, and use a hex wrench to turn that screw until the IHS pops off. The only way to screw this up is to put the CPU in with the wrong orientation, but the arrow in the corner makes that pretty difficult.
With a few twists of the hex wrench, I felt the IHS pop off, and was only momentarily panicked by the mental image of somehow crushing my CPU. But it worked perfectly. Phase one complete!
The biggest gaming news, reviews and hardware deals
Keep up to date with the most important stories and the best deals, as picked by the PC Gamer team.
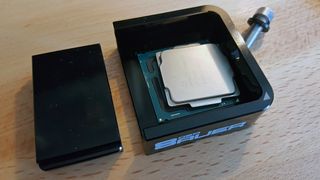
Now for the part that's genuinely scary. With the IHS detached, there's a lot of glue gunk to remove from the PCB and the IHS itself. While there are no delicate components around the die, I wasn't sure exactly how hard I should be scraping. I didn't want to damage anything, so I spent a good 20 minutes methodically scraping away with a credit card and a toothpick. I'd blow off the detached debris and wipe it down with a tissue until, finally, all the gunk was gone.
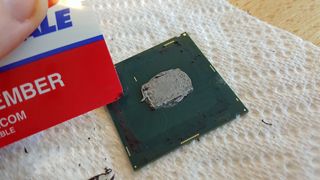
That left the die itself, which had Intel's thermal paste on it. Here I used a drop of my thermal paste removal solution and wiped it gently with a tissue. Touching the die feels a bit like poking a brain with your finger.
Next step—a great tip I picked up from watching some Youtube delidding walkthroughs—covering the PCB with scotch tape before uncorking the Liquid Ultra. Turns out this liquid metal material really squirts out.
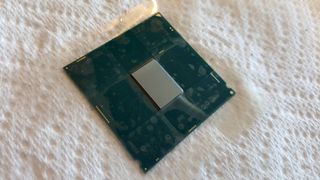
Here's roughly what was going through my head as I started squeezing the Liquid Ultra's syringe: Huh this stuff doesn't want to come out. Is it clogged? Let's try a little more force. Still nothing. A liiiitle more force. Still nothing. A liiii-OH GOD IT'S EVERYWHERE.
Tape: lifesaver. I squirted out a big glob of liquid metal, but I was able to use a toothpick to pull half of it off the die, as you can see on the lower-left corner of the chip below. Then I set to work spreading a thin, even layer of Liquid Ultra across the surface of the die. It was convenient to be able to safely brush the excess off at each end.
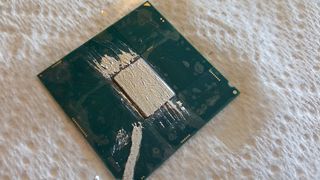
Once I had the material as evenly spread as possible, I peeled off the tape and placed the pristine PCB into the socket. It feels a little like pushing the CPU out the door naked, but the clothes come next.
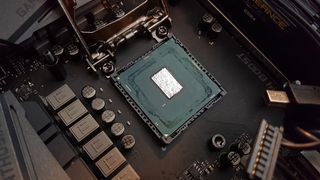
Aside from scraping off the glue and cleaning the die, this last step is the one I was most worried about: placing the IHS back onto the chip. Some people choose to re-glue the IHS with temperature-resistant silicone, and the Delid-Die-Mate does include a little attachment to help you do just that. But that's a much more permanent move, and I was still a bit worried I might screw something up, so I decided to forego it.
It's totally fine for the IHS to sit loose on top of the PCB, because the socket should apply enough force to hold it in place. The only catch: positioning it properly. Because the socket will push downwards on the IHS a bit, you want to position it slightly above center before you lock it in.
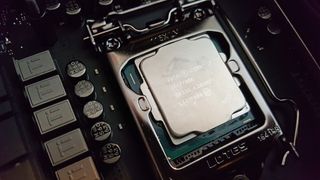
Done! As you'll see in this photo, my placement wasn't quite perfectly centered. It's still riding a bit high, and favors the right side of the socket. But it's close enough. What matters is that it's held firmly in place, and the IHS makes solid contact with the heatsink. What I made sure not to do is lift up and reposition the IHS once I'd put it into place. I didn't want to risk spreading any of that conductive liquid metal around the PCB. If it's good enough, just let it lie.
I applied my new Thermal Grizzly Kryonaut paste, which somehow ended up being one of the most fraught steps in the process. I skipped the usual "pea" method to try to spread the paste manually with the included spreader, and it felt like a small disaster. I just could not get an even spread and kept adding more and more paste and it seemed to vanish (or stay attached to the worthless mini spatula) as I spread it around. I finally got a decent distribution, but I'm sticking to the pea method from now on. That could've gone better.
Now for the moment of truth. Would it boot? Would the temperatures be better, or had I screwed up and somehow made them worse?
Aw yeah, baby. My CPU lives!
Performance comparison
If I were technical editor Jarred Walton, this is the part where I'd hit you with a bunch of graphs detailing exactly how much of a temperature difference delidding made for my CPU across 12 different games. But I set out to document the delidding process first and foremost, and didn't take the time beforehand to record exactly how my CPU was performing. Oops.
Thankfully, I've got some anecdotal observations and some data from NZXT's CAM software to back me up.
Before, my CPU tended to idle in the mid-40C range using NZXT's Kraken X42 cooler set to its "silent" profile. Sometimes it would get as low as 40C, but I never saw it dip into the 30s. I should point out that I wasn't trying to run the CPU as cool as possible—my goal was to keep my system essentially silent with a very quiet fan profile, and I hoped delidding would let me do that at lower temperatures.
And boy, has it ever. My CPU now idles in the 30C range, several degrees cooler than it was before. Nice! Very nice. At idle, it now even dips down to around 28C on occasion. But the bigger difference comes at the high end. Where active gaming used to push my CPU above 70C, with the Liquid Ultra applied, the highest temperature I've recorded is 62C. Oh, and that's with an overclock.
I used Intel's Extreme Tuning Utility to bump the 7700K from its base clock of 4.2GHz (and turbo of 4.5GHz) up to a 4.8 GHz overclock, with a small voltage offset. According to Jarred's testing, with more voltage I should be able to hit a stable 5GHz. But as it stands, my CPU is running at a stable 4.8GHz, and playing demanding games like Killing Floor 2 and running XTU's stress test barely passed the 60C mark.
Considering the 7700K can easily hit 90C, I'm going to call this delidding process a massive win.
Conclusion
Delidding certainly isn't for everyone—it's not a PC modification you need to do, and it'll cost you about $50 to buy a delidding tool and special thermal paste if you take the same route I did. There's also no guarantee that you'll see the kind of cooling performance gains I did. That will depend on your CPU model, cooling setup, and even the individual chip you get (it's the luck of the draw how overclockable your chip is). But if you have a new Kaby Lake CPU, especially an i7, I think you can safely bet on some seriously lower temperatures.
While the Delid-Die-Mate 2 has been tearing through supply stock and may be tough to get internationally, you can buy the similarly safe Rockit 88 delidding tool as an alternative. I wouldn't recommend delidding with a razor blade to anyone.
But as I said with my regrettable school metaphor at the start of this article, delidding is like the ultimate step along the path of building your own PC. When Evan wrote about why you should build your PC, he talked about better understanding the guts of a PC can change your appreciation of the technology. It brings you closer to your hobby. Overcoming the fear of taking my CPU apart definitely did that for me. And now my CPU can run at 5GHz without breaking a sweat. That's pretty cool, too.

Wes has been covering games and hardware for more than 10 years, first at tech sites like The Wirecutter and Tested before joining the PC Gamer team in 2014. Wes plays a little bit of everything, but he'll always jump at the chance to cover emulation and Japanese games.
When he's not obsessively optimizing and re-optimizing a tangle of conveyor belts in Satisfactory (it's really becoming a problem), he's probably playing a 20-year-old Final Fantasy or some opaque ASCII roguelike. With a focus on writing and editing features, he seeks out personal stories and in-depth histories from the corners of PC gaming and its niche communities. 50% pizza by volume (deep dish, to be specific).
Most Popular

