Building a next-level liquid cooled PC with Ryzen
Follow our guide to building your own mini-ITX piece of computational perfection.
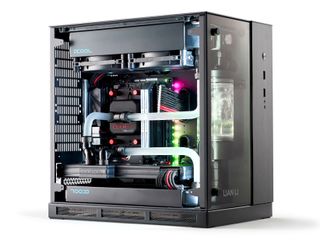
Liquid luxury
Let's get down to the nitty-gritty as to what makes this build tick, and why we chose what we did. Much like the cooling you add to a system like this, when approaching a water-cooled rig’s construction, you need to be fluid in your approach. Get the hardware you want ahead of time, try to plan the layout as best you can, then work around each problem as you come across it. Sometimes, this means getting in more gear than you need, be it fittings, tubing, fans, you name it. It’s a sacrifice that has to be made, especially in the smaller form factor builds, because clearances and bends become ever more complicated.
We got in a whole ton of liquid-cooling fittings ahead of time: 12x 90-degree fittings, 8x 45-degree fittings, 4x snakehead S fittings, 12 standard hard tube compression fittings, soft tubing fittings, pass-throughs, Y bends, valve fittings, and excessive levels of extension fittings, in an attempt to make everything fit just right. We didn’t end up using all of these, of course, because there’s just no way to accurately predict how much you’re going to need.
If you’ve got the time, it’s always wise to do these builds slowly, buy the parts as you need them, get your tubing runs right, and don’t rush it. It might take a month or two to complete, even with the applicable budget, but it’s the only way to make sure you don’t spend any more cash than you absolutely have to.
1. Preliminary fitting
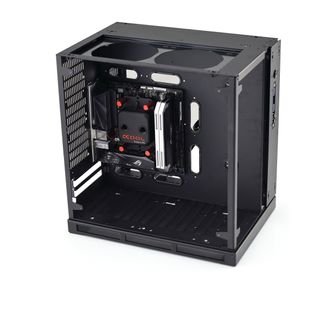
Step one: The doozy—the strip-down. It’s so, so, so important you get this right, especially in a liquid-cooled build, particularly when it’s as tight and cramped as this, because it’s the perfect opportunity to see where your radiators fit, and try to figure out your tubing runs, and where you might need pass-throughs. In our case, we knew ahead of time we’d need every edge we could get.
That meant reducing physical drives, cable clutter, anything that might cause an issue. The hard drive cage and grommet covers were all removed prior to the build shoot. Once we began, we got the motherboard set up ASAP—that meant CPU in, block on, memory in, and M.2 storage in. Once that was all secured, we quickly installed it to see exactly where we’d need to fit everything else.
2. Radiator conundrums
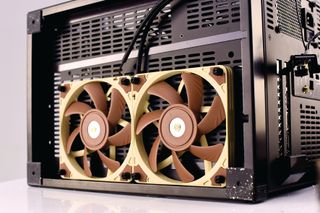
We knew this build was going to struggle with airflow. Having no traditional front panel meant air access came from the bottom and top—and that was it. Problem is, there isn’t enough space to mount fans in the bottom if you’re using an additional radiator there as well. To get around this, we decided to invest in two slim 120mm Noctuas, and mount them on the underside of the chassis. We also had to move the radiator as far forward as we could to make sure the fittings wouldn’t be blocked by the GPU.
We used rubber washers with the screws, to secure the fans to the radiator, as they’re 10mm slimmer than their standard counterparts, and we needed to make that up somehow. There’s a few adjustments we can still make. In an ideal world, we would replace the feet with aftermarket custom-cut acrylic ones, to give the chassis more height, and allow us to use full-sized, more powerful Noctuas instead. Couple that with some fan guards, and we’d be good to go.
The biggest gaming news, reviews and hardware deals
Keep up to date with the most important stories and the best deals, as picked by the PC Gamer team.
3. Fat fittings
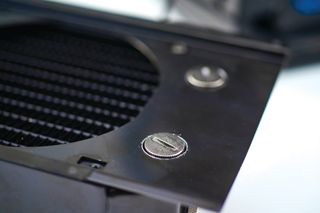
More radiator challenges: this time from the top thick-as-hell 45mm rad. By default, the bigger 45s come with a massive reservoir at the end, alongside six individual G1/4-inch mounting holes (seven if you include the one at the other end), all of which need plugging. It’s great for choices in loop orientation, less so when you’re mounting them to flush radiator brackets, like the one on the PC Q37.
As these stop fittings were pushing the rad down, we took the radiator mounting bracket out of the chassis, marked up where the fittings were going to go, found the center using a rule, drilled a pilot hole, then used a mandrel to take out the rest, allowing the fitting to pass through unhindered, and reducing our clearance issues. There’s another removable brushed aluminum panel that sits on top of this, so our handiwork is hidden, but it’ll also act as a drain valve or fill port when we have to do some loop maintenance.
4. Reservoir mounting bracket
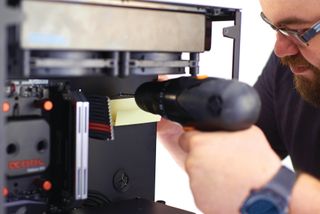
Next up on the list of modifications to the chassis (and the first appearance of our bearded modding assistant) is a reservoir mounting bracket. We didn’t really need to add this bracket, as the reservoir is secured by two 15mm-long extension fittings coming off the bottom radiator, and a second fitting coming out of the bottom-right of the res, connecting to a future drilled pass-through, going through the motherboard panel and into the pump, hidden on the other side.
That said, to keep our res sitting proud and level, adding this bracket (included with the res) makes sense. Using a permanent marker, and some extra hands to hold the res in place, we marked the holes we needed to drill, before pumping through that soft gooey aluminum with a standard 4mm drill bit. You might notice the use of a sticky note here; fold it to create a tray, and attach it below where you intend to drill, to catch all the metal filings.
5. Pump shenanigans
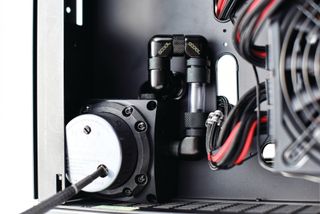
This part was possibly the most frustrating. From past experience, we knew soft tubing in the rear of the case was going to make our lives easier. Unfortunately, due to the lack of room and the need for pass-throughs in places for the reservoir, the tight curves led to the most obvious tubing runs kinking, which is bad.
In the end, just to fit the pump in the chassis, we had to remove one of the plastic grommets that hold the side panel in place (there are seven in total, so losing one isn’t the end of the world), then run four 90-degree fittings, with the smallest slither of soft tubing between to reach the pump inlet. To finish the loop, we ran an additional length of soft tubing straight up from the left-hand side of the pump to a second pass-through in the roof, connecting to the radiator on the other side.
6. Cutting blind
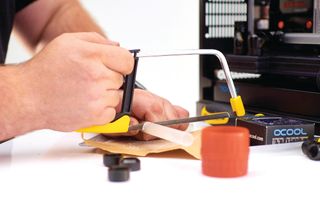
We know what you're thinking: No guide, no securing tool, cutting straight down on a table, with a hacksaw? What? Don’t worry. You can be super anal about cutting tubing, but you don’t need to be. It doesn’t even need to be that straight a cut. The best way to cut tubing is to work out how long a length you need, and cut it with a hacksaw, in as comfortable a position as possible.
Make sure you stay safe, of course, and cut off more than you think you’ll need, but if you mess up the end, don’t sweat it. If the cut is wonky, use sandpaper or needle files to smooth the rough edges and make it level. Next, use a deburring tool to give your tube some soft edges, making it easier to fit, then sand it some more to get rid of the grit, blow it out, and bam! Job done: one straight, level, chamfered, clean tube.
7. 90 Degrees 4 Lyf
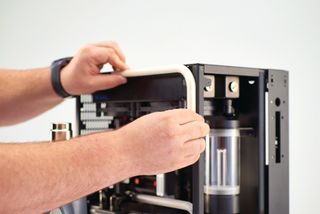
There’s a phrase we always repeat to ourselves whenever it comes to building liquid-cooled rigs: “Keep it simple, stupid.” This is especially relevant with tubing runs, where it’s almost always a better decision to use a fitting in place of a bend, unless there’s no other option.
If you do want bends in your tubing, the best way to integrate them is through pure 90-degree angles. They’re the simplest and quickest bend to create—you don’t need any carefully crafted angle templates or anything weird, because the whole world is literally filled with 90-degree angles. Us humans, we love square edges. In this case, to make our bends, we’re using the edge of the chassis itself to line up our 90-degree angle, mid-bend, to make sure it’s the perfect shape. This particular tube will go on to become our CPU-to-GPU line.
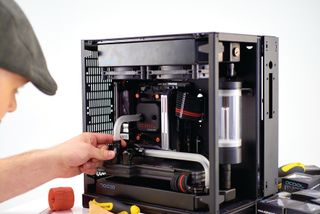
8. Fittings with style
This is what we were talking about. You can see we’ve used a rotary S-fitting (acting as two 90-degree fittings) to connect a 90-degree length of tubing from the GPU to the CPU block. This way, we can keep the tubing looking clean, straight into the GPU block, without harming the overall aesthetics. The other 90-degree line coming out of the GPU is a combination of two 90-degree fittings, followed by a length of tubing with a 90-degree bend, which goes down into the radiator below.
This allows the coolant to pass into the rad, then up through a male-to-male rotary connector and two extensions, which then go into the reservoir. The smart thing about having those rotary extension fittings below the reservoir is that we can rotate the res, without losing compression on the rubber o-rings, which lets us test other tubing runs without unscrewing the res entirely.
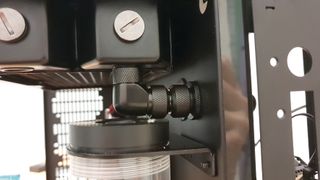
9. The little details
The smallest parts in a liquid-cooled build are the most difficult to work with. This little length of tubing, connecting the pump to the pass-through and into the radiator, took us 45 minutes to get right, perpetually sanding and shortening it to get it to fit correctly. Even then, we realized the pass-through itself needed to be moved ever so slightly to the left, purely to keep the tubing run straight and level. That’s not an absolute necessity, more of an aesthetic design decision, if anything.
But because aluminum is so soft to work with, as metals go, it’s easy enough to take a needle file to it, and just shift the pass-through ever so slightly to perfect the tubing run. On top of that, the smaller you go, the more troublesome it becomes to secure the compression fitting tops, because you start running out of space.
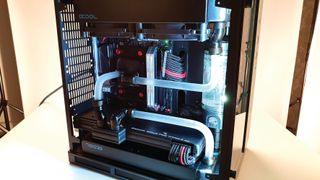
10. Priming up
Decisions, decisions. Once all our tubing runs were complete, there was one last decision to make: coolant color. We decided to go with the Mayhems Clear X1 as opposed to the UV Black we also had, because the frosted tubing Alphacool sent us looked so sexy on its own. Running black coolant through it would take away some of the aesthetic love. That, however, was the least of our worries, because we had to fill and prime the loop first, which is a daunting task with even a simple loop, never mind ours.
For this rig, we had to tip the entire system sideways, unscrew the cap on the side of the reservoir facing upward, then partially fill the res as high as we could, screw the cap back on, turn it back up, power cycle the pump until the res was empty, then repeat until done.
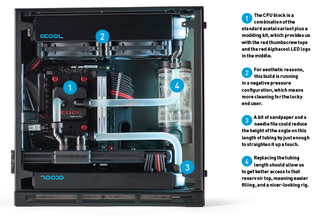
Waterworks
That's it, then. We’re done, wrapped up, finished. Or are we? No. There’s plenty more to do. We ended up taking three days to build this rig. Even with the help of Alphacool’s marketing rep and pro-modder, Dave Alcock, it took nearly twice as long as we expected. And there are still erroneous parts and little niggles to tweak to make this rig really shine.
First on the block are those Alphacool radiators. There are two annoyances here: the bottom rad’s logo is upside down, and the logos are blue. To get around this, we’re going to get some red vinyl Alphacool labels printed up, which we can overlay on them.
Next on the list is the memory. In the end, HyperX couldn’t get the kit we wanted to us in time. No one’s at fault, as it was down to an erroneous shipping delay handled by a third-party courier. Because of that, we had no choice but to lean on 16GB (2x 8GB) of Corsair’s Dominator Platinum DDR4 @ 3,200MT/s for this build—the backup RAM we mentioned earlier—fitted with a couple of lightbar upgrades.
But again, silver and white doesn’t match our build, and that spec isn’t the 32GB we’d hoped for, so a quick pitch to Corsair may be in the pipeline. To cure the silver and white bars on top, CableMod sells a black variant of the lightbar upgrade kit, with a red LED strip in the middle, too, so that should help smarten up the interior a little.
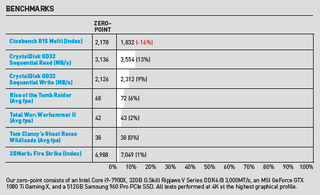
There’s a lot we can do with the cable management in the back, too, as we were up against the wire here, so that’s going to be addressed almost immediately. We’ve also got to find a plan for our simple six-way XSPC fan controller. And the magnetic LED strip we’ve hidden in the front corner of the chassis needs a stronger form of adhesive, Velcro perhaps, as the aluminum support bar isn’t magnetic.
Lastly, there are some loop tweaks we could do. There’s not a lot we’d change here; perhaps sand down the radiator end of the GPU tube, to bring the angle down a touch, and work on a fancier length of frosted tubing to connect the CPU and the top rad together, perhaps consisting of two 90-degree bends, and reducing our reliance on fittings.
All that aside, and the frustration, delays, and massive effort involved from everyone on the team, we’re immensely proud of this build. It’s cool, quiet, and lovely to look at, even with its flaws. It performs like a trouper, and kicks Maximum ass. There’ll be more of this beauty (hopefully with all the tweaks) in a later issue, including the final desk build and peripheral setup, so keep an eye out!
This article was originally published in Maximum PC's July issue. For more quality articles about all things PC hardware, you can subscribe to Maximum PC now.
After graduating from the University of Derby in 2014, Zak joined the PC Format and Maximum PC team as its resident staff writer. Specializing in PC building, and all forms of hardware and componentry, he soon worked his way up to editor-in-chief, leading the publication through the covid dark times. Since then, he’s dabbled in PR, working for Corsair for a while as its UK PR specialist, before returning to the fold as a tech journalist once again.
He now operates as a freelance tech editor, writing for all manner of publications, including PC Gamer, Maximum PC, Techradar, Gamesradar, PCGamesN, and Trusted Reviews as well. If there’s something happening in the tech industry it’s highly likely Zak has a strong opinion on it.
Most Popular


